Resources/Materials Guide
Restorative Materials

Dental Lab
Materials Guide

Every material we mill, press and cast in-house, with the strength data and indications behind it. Built as a prescribing reference for the practices we work with across Melbourne and Victoria.

01

Zirconia

Zirconium Dioxide · Milled

Polycrystalline zirconia milled from solid pre-sintered blanks, then sintered to full density. The default choice wherever load-bearing strength governs the case — posterior units, long spans and full-arch work — supplied monolithic for maximum strength or cut-back and layered where the smile zone demands more depth.

  • Three generations: 3Y, 4Y, 5Y
  • Strength traded against translucency
  • Monolithic or layered finish
  • Metal-free and biocompatible
  • Minimum thickness varies by generation
Indications — Crowns, bridges, implant restorations, full-arch
02

Lithium Disilicate

IPS e.max · Pressed or Milled

A glass-ceramic with the light transmission of natural enamel, either heat-pressed from ingots or milled and crystallised. Where aesthetics lead the case, this is the material of record — chameleon-like blending, a highly polishable surface and adhesive bonding that supports minimal-prep and no-prep veneer work.

  • Flexural strength 360–500 MPa
  • Enamel-like translucency
  • Multiple ingot opacities and shades
  • Adhesive bonding protocol
  • Supports minimal-prep veneers
Indications — Anterior crowns, veneers, inlays and onlays
03

Porcelain Fused to Metal

PFM · Cast Substructure

A cast metal coping layered with feldspathic porcelain — the longest clinical track record of anything on this page. Still the pragmatic answer for long-span bridgework, heavy parafunction and cases where a proven, predictable result matters more than absolute translucency.

  • High-noble, noble or base alloys
  • Decades of longevity data
  • Reliable margins on long spans
Indications — Long-span bridges, bruxism cases
04

Titanium

Grade 5 Ti-6Al-4V · Milled

Medical-grade titanium milled for implant components where the restoration meets bone and soft tissue directly. Exceptional biocompatibility and corrosion resistance at low weight, with milling tolerances held tight enough for passive fit across multi-unit screw-retained frameworks.

  • Grade 5 Ti-6Al-4V alloy
  • Outstanding biocompatibility
  • Corrosion and fatigue resistant
  • Compatible with major implant systems
Indications — Custom abutments, screw-retained bars and bridges
05

Chrome Cobalt

Co-Cr Alloy · Cast or Milled

A rigid alloy that holds its form at a thin cross-section, which is precisely what a removable partial framework needs — strength without bulk against the palate or floor of the mouth. Cast to model or digitally milled, with clasp design planned around the surveyed undercuts.

  • High rigidity at thin section
  • Long-term dimensional stability
  • Designed to surveyed undercuts
  • Nickel-free formulation available
Indications — Removable partial denture frameworks, cast clasps
06

Flexible Nylon

Valplast · Injection Moulded

A thermoplastic nylon resin injection-moulded into metal-free partials. Clasps are gum-toned and flex around undercuts rather than gripping over them, which makes the appliance visually discreet and a practical route for patients with metal or acrylic monomer sensitivities.

  • Metal-free and hypoallergenic
  • Gum-toned translucent clasps
  • Lightweight and shatter resistant
  • No monomer content
Indications — Aesthetic flexible partials, metal-sensitive patients
Zirconia In Depth

Not All Zirconia Is The Same

The zirconia used in dentistry is yttria-stabilised tetragonal zirconia polycrystal — Y-TZP. It is classified by how much yttria it contains, in mol%, into 3Y, 4Y and 5Y. That number determines the cubic particle content, which in turn determines how much the material can rely on transformation toughening. We select the generation for you, case by case, from the preparation, the occlusion and the aesthetic demand — which is why it is worth understanding what we are weighing up.

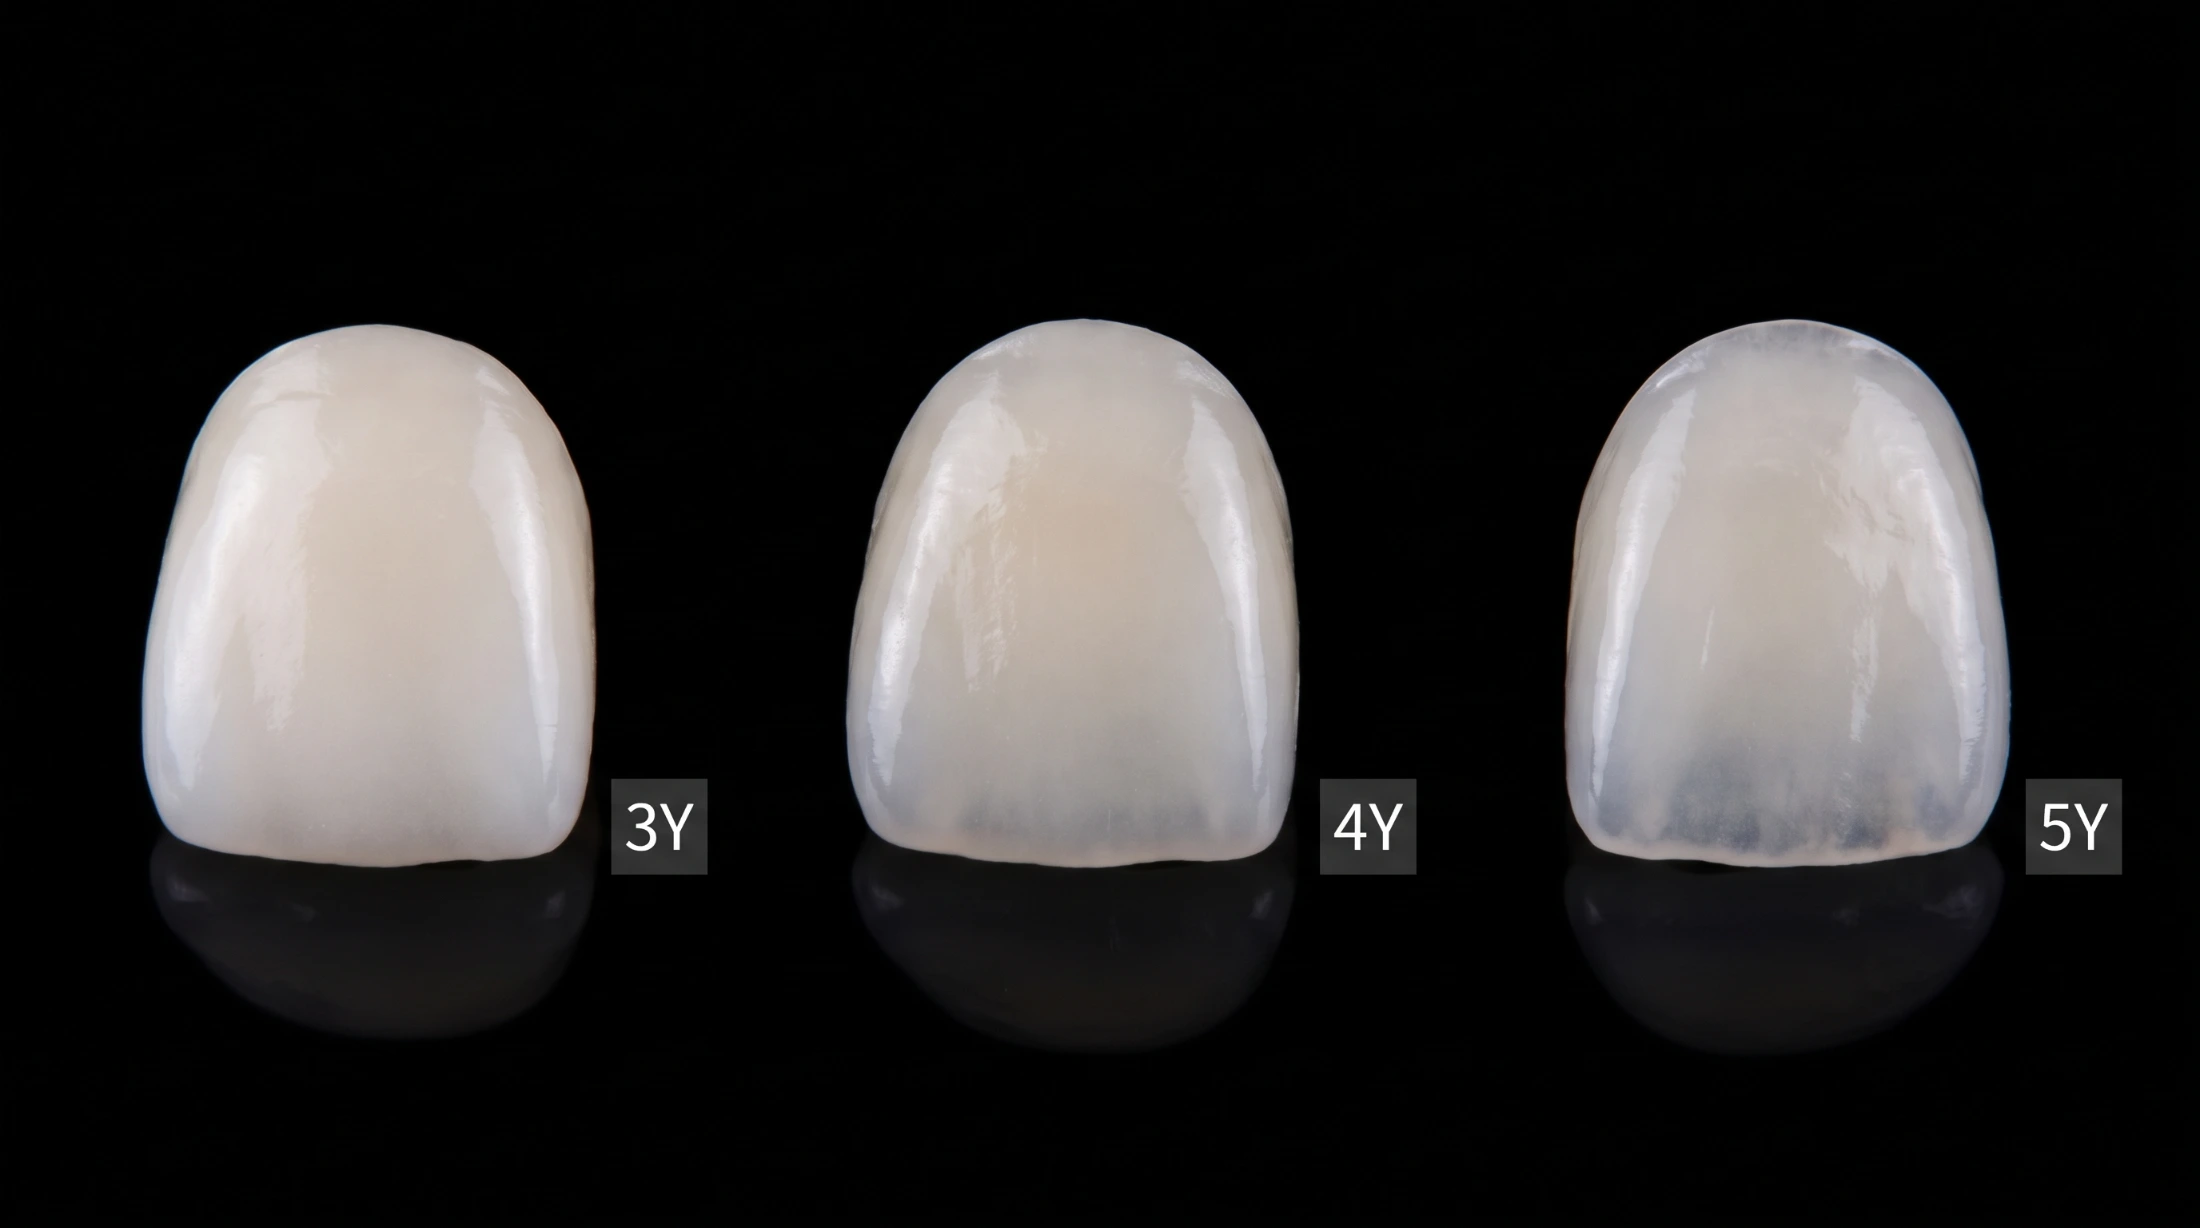
Three zirconia crowns labelled 3Y, 4Y and 5Y photographed side by side, showing increasing translucency
3Y, 4Y and 5Y side by side — translucency rises left to right, strength falls with it
3Y

First Generation

~3 mol% yttria

The high-strength formulation, and the one that benefits most from transformation toughening. Relatively opaque, but it tolerates the thinnest cross-section of the three by a clear margin — which makes it the conservative choice as well as the strong one.

We use it for — Posterior monolithic, long spans, high load, minimal reduction
4Y

Second Generation

~4 mol% yttria

More yttria means more cubic phase, more light transmission and less toughness. 4Y sits deliberately in the middle and is the most broadly useful formulation for single units that have to look convincing without giving up too much strength.

We use it for — Premolar and anterior single crowns, short spans
5Y

Third Generation

~5 mol% yttria

The most translucent and the least tough. It approaches glass-ceramic aesthetics, but it is not a substitute for high-strength zirconia: thickness and connector dimensions matter more here, and heavy parafunction is a contraindication.

We use it for — Anterior aesthetic single units on adequate thickness
The Numbers

Generation Comparison

The trade-off in one table. Note that it runs in opposite directions: as light transmission rises, flexural strength falls and the minimum thickness you must leave us goes up.

 3Y4Y5Y
Flexural strengthHighest — approx. 1,200–1,450 MPaApprox. 800–1,350 MPaLowest — approx. 600–900 MPa
Light transmissionLowest — approx. 29%Approx. 37%Highest — approx. 42%
Multigradient 4Y–5Y discsStrength graded within the disc — approx. 700 MPa at the incisal edge rising to 1,100–1,300 MPa at the cervical
Min. thickness, posterior0.5–0.7 mm0.7–1.0 mm1.0 mm
Min. thickness, anterior0.4 mm0.4–0.8 mm0.4–0.8 mm
Transformation tougheningGreatest benefitReducedLeast

The practical consequence is preparation depth. Full-contour 3Y can be taken down to half a millimetre posteriorly; the translucent generations need roughly double that. Your preparation therefore sets the ceiling on what we can select — a conservative prep commits the case to high-strength zirconia. If the aesthetic demand is high, tell us before you prepare so we can advise on the clearance the case will need.

Flexural strength figures are approximate ranges from current manufacturer data for the zirconia discs we use; light transmission figures are as charted in the cited comparative work; minimum thickness figures are for full-contour crowns. Both vary by manufacturer and product — always confirm against the instructions for use for the material being prescribed.
Cement or Bond

You Usually Do Not Need To Bond

This is the most persistent misconception about the material. Published review work is direct about it: zirconia crowns and bridges with adequate thickness, good retentive form and accurate fit do not require bonding. Conventional cementation is appropriate — glass ionomer, resin-modified glass ionomer, or a self-adhesive resin cement.

Cement It When…

  • Thickness meets the generation minimum
  • Preparation has retentive form
  • Fit and margins are accurate
  • Full-coverage crown or conventional bridge

Bond It When…

  • Retention is limited or the prep is short
  • Resin-bonded or cantilever designs
  • Thin or high-translucency units
  • Inlays, onlays and partial coverage

Even when you cement, abrasion often helps. Many manufacturers recommend air-particle abrasion of the bonding surface before cementation — particularly with self-adhesive resin cements — for improved bond strength. Read the instructions for the cement you are actually using; the recommendation is not uniform across products.

→

Conventional cementation, in order

Try in and confirm fit. Clean the restoration if it has been in the mouth. Air-abrade the bonding surface if the cement's instructions call for it. Then load cement into the restoration per the manufacturer's instructions and seat on the tooth. Nothing exotic — the discipline is in the cleaning and the sequence, not the materials.

When You Do Bond

The APC Protocol

Zirconia contains no glass phase, so hydrofluoric acid does nothing to it and silane alone will not produce a durable bond. Where a bond is genuinely required, the established approach is three steps in sequence — the APC concept, published by Blatz and co-authors as a summary of some twenty-five years of zirconia bonding research.

A

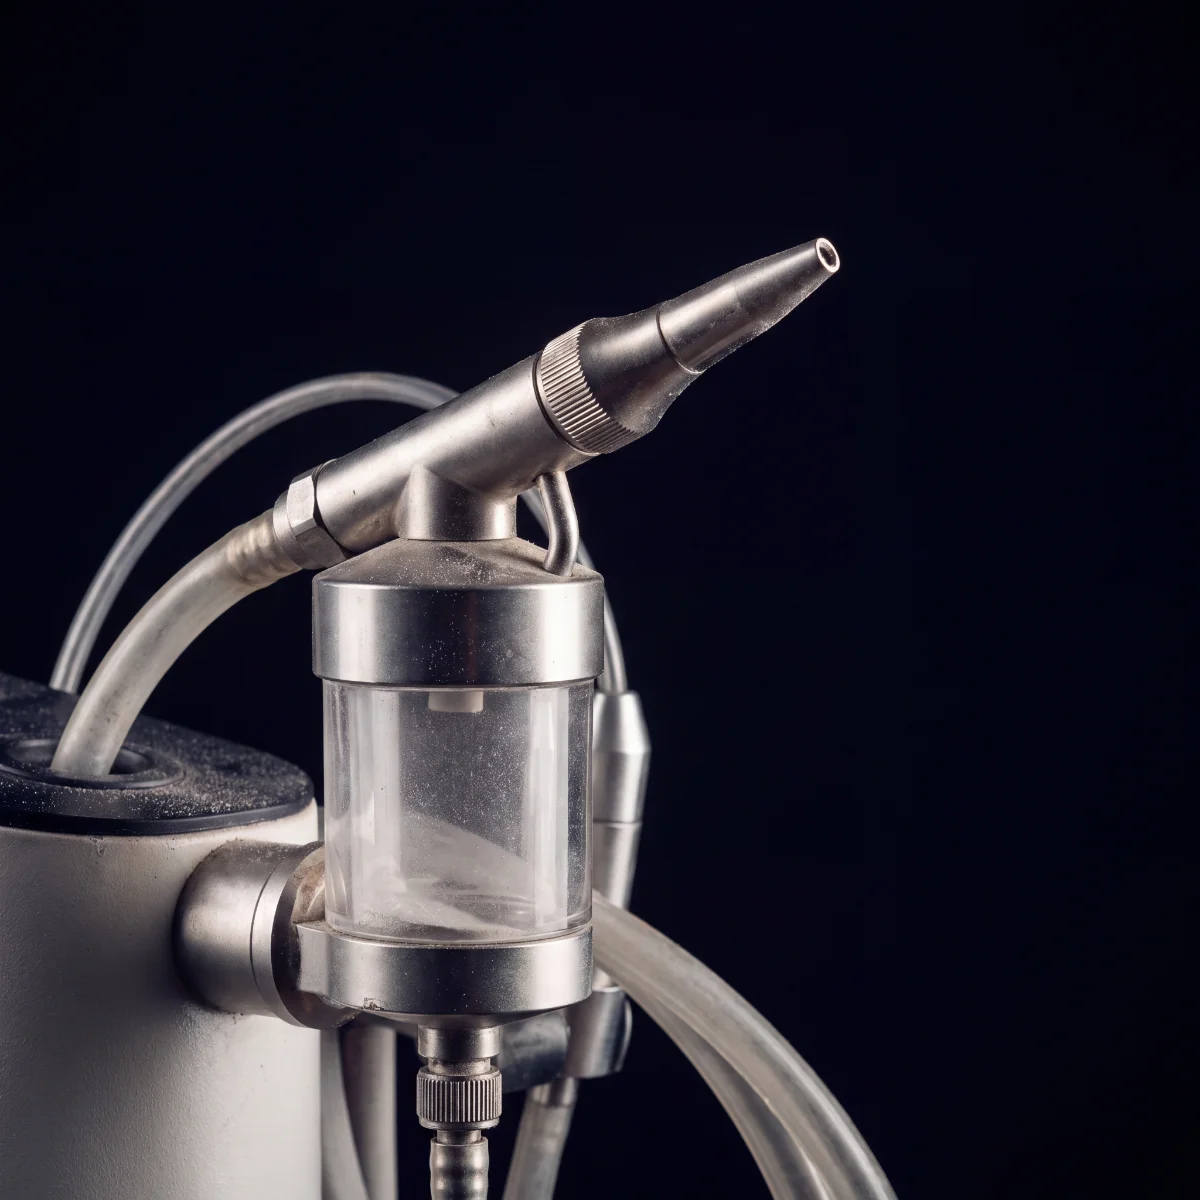
Air abrasion — for decontamination, not roughness

Intraoral sandblasting handpiece with alumina powder reservoir

Alumina particles in the 30–60 µm range at low pressure — around 0.2 MPa for approximately five seconds is the parameter set reported, or whatever the manufacturer's instructions specify. Contrary to common belief, the roughening effect on zirconia is minimal at best. What abrasion actually does is decontaminate the surface and raise its free surface energy, which is what allows the primer to work. That distinction matters: it explains why abrasion cannot be replaced by a rinse, and why heavier pressure buys nothing.

P

Zirconia primer

A primer containing a phosphate monomer, typically 10-MDP, is what creates the chemical component of the bond. This is the step most often skipped or substituted with silane, and silane is not a substitute. Observe the drying and waiting times in the instructions for use — they differ meaningfully between products.

C

Composite resin cement

A dual-cure or self-cure composite resin cement completes the sequence. Used together and in this order, the three steps are what the evidence supports; used partially, the bond is materially weaker than the figures quoted for the full protocol.

The bond is stronger than its reputation. Long-term outcome data on anterior cantilever zirconia resin-bonded prostheses reports survival above 97% at fifteen years using the APC protocol. The old claim that zirconia cannot be bonded reliably does not survive contact with that evidence — what it needs is the correct surface treatment, not a different material.

Resin-Bonded Bridges

Zirconia cantilever resin-bonded prostheses are a well-documented application of the protocol, with the long-term survival figures above. Single-retainer cantilever designs are the form most of that evidence relates to.

Zirconia Veneers

Yes, they are possible, and we make them. If the bond is adequate for resin-bonded bridgework carrying occlusal load, it is more than adequate for laminate veneers — provided the APC sequence is followed and the preparation gives us the thickness the generation requires.

After Try-In

Cleaning Contaminated Zirconia

Saliva contaminates the bonding surface during try-in and measurably decreases bond strength. Rinsing with water does not reverse it. This is the single most commonly overlooked step in the whole sequence, and it is entirely avoidable.

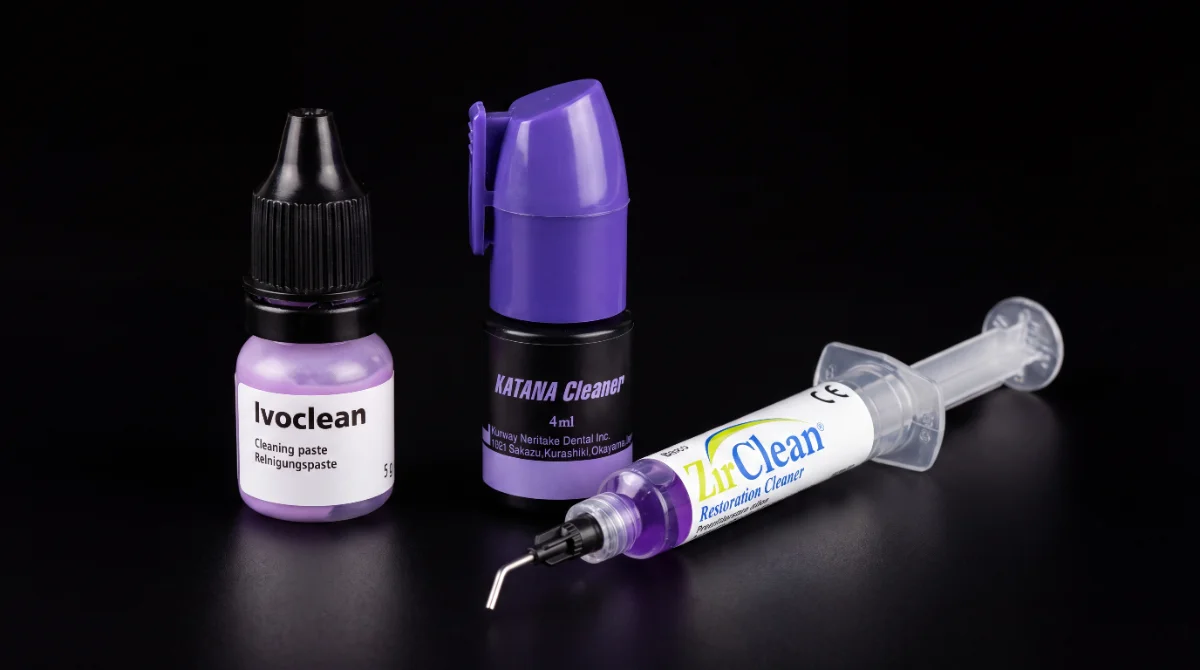
Three dedicated zirconia restoration cleaners: Ivoclean, KATANA Cleaner and ZirClean
Dedicated ceramic cleaners — effective decontamination, but not a replacement for abrasion
First Choice

Ultrasonic Bath, Then Re-Abrade

Try in, then clean the restoration in an ultrasonic bath in alcohol for around five minutes, followed by the full APC sequence — air-particle abrasion, primer, composite. In the comparative work, air-particle abrasion produced significantly higher bond strength than any other cleaning method tested.

Alternative

Dedicated Ceramic Cleaners

Purpose-made zirconia cleaning agents are effective at decontaminating the surface and do increase bond strength. They are viable alternatives — but the same work is explicit that they do not supersede air-particle abrasion in decontamination efficacy. Abrasion both cleans and raises free surface energy; a cleaner only cleans.

In Practice

Which One To Reach For

Use a ceramic cleaner after try-in when the lab has already air-abraded the bonding surface and you do not have a sandblasting unit in the surgery. If you do have one, re-abrading after try-in remains the stronger option.

What we do at our end. Bonding surfaces are air-abraded before the case leaves us, so the restoration arrives ready. That preparation is undone by a single intraoral try-in — so if the case has been tried in, treat the surface as contaminated and clean it before you cement or bond.

Surface Finish

Polishing Zirconia

Adjusted zirconia should be repolished, not left ground. Zirconia has a small grain size and takes a higher gloss than natural enamel — but only if the sequence is followed. A ground surface abrades the opposing dentition, holds plaque, and in tissue-contact areas works against the mucosal seal.

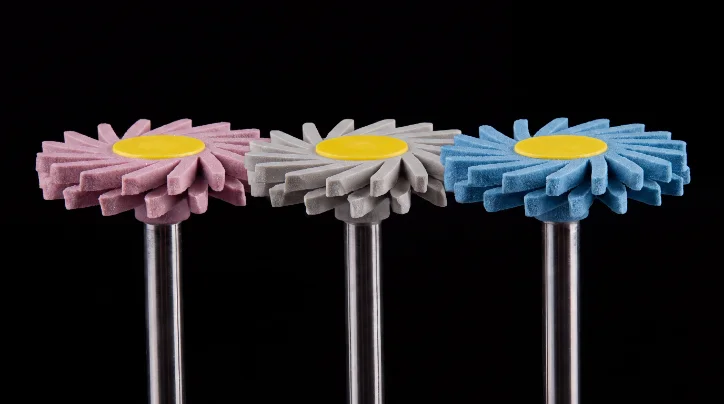
Three zirconia polishing wheels in coarse, medium and fine grades
Coarse, medium, fine — work through the sequence in order, do not skip to the last
01

Start coarse and follow the sequence

Begin with the coarse polisher and work through in order. Skipping to a fine polisher leaves the adjustment scratch pattern in place — the surface reads glossy in patches without ever becoming smooth. Electron microscopy of stepwise polishing shows scratch depth reducing at each stage, which is precisely the mechanism being relied on.

02

Coarse plus medium is usually enough

For soft-tissue contact, a roughness around Ra 0.2 µm is the commonly cited target for epithelial adherence, and coarse followed by medium is reported as sufficient to reach it. The fine third step is optional — useful for luster on visible surfaces, not required for tissue-facing zones. Two-step systems made specifically for zirconia condense the same sequence into one pair of instruments.

03

Moderate speed, light pressure

Around 15,000 rpm is reported as an effective polishing speed. Higher speed and heavier pressure generate heat without improving the finish. Light intermittent contact, and let the instrument sequence do the work rather than force.

04

Use the highest-gloss step sparingly

Because zirconia polishes beyond the gloss of enamel, running the final polisher hard produces a surface that reads as artificial alongside natural teeth. On visible surfaces, use it lightly for a natural luster rather than a mirror.

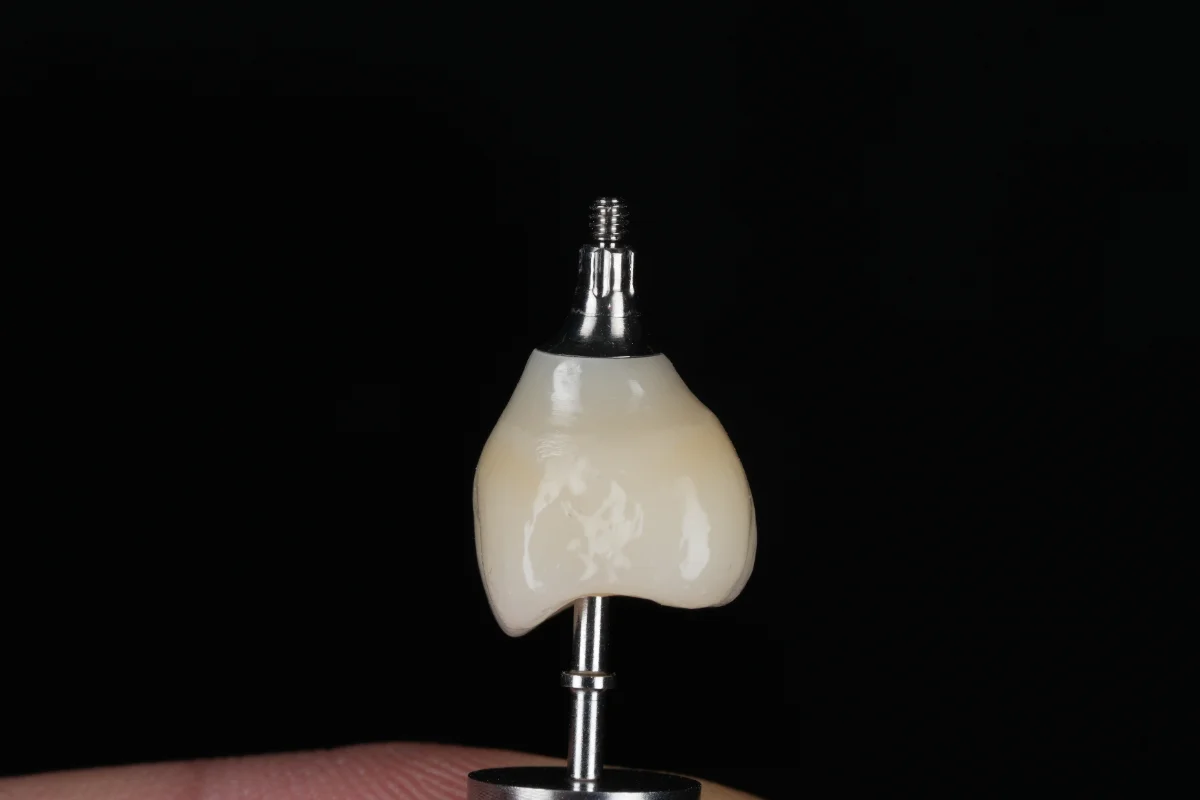
Monolithic zirconia implant crown on a titanium base, polished emergence profile
Polished emergence profile on a screw-retained zirconia crown
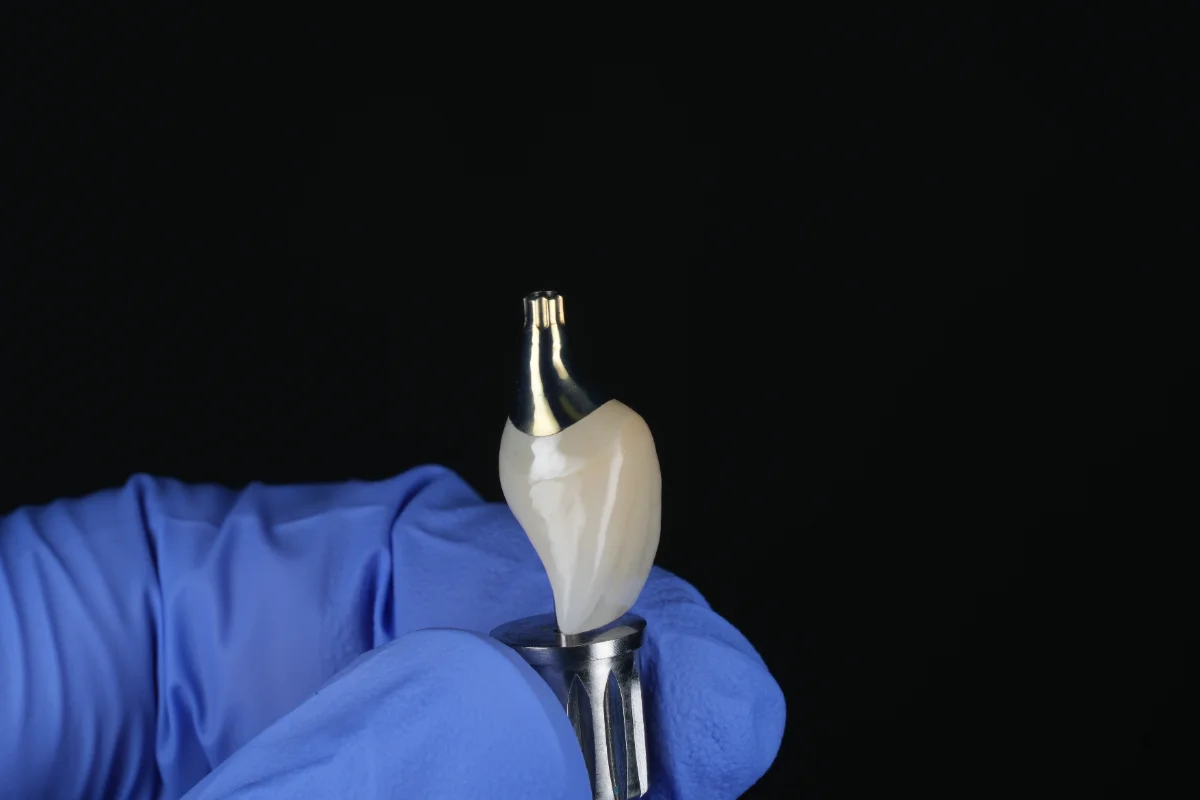
Zirconia implant crown bonded to a titanium base, held in a gloved hand
Tissue-facing zirconia — polishing here is biological, not cosmetic

Why it matters in tissue-supporting areas. A highly polished surface in contact with the junctional epithelium promotes epithelial cell adhesion and supports a stable mucosal seal, while minimising bacterial colonisation and reducing the risk of peri-implant inflammation. Polishing subgingival and tissue-facing zirconia is a biological step, not a cosmetic one.

Implant Restorations

The Emergence Profile In Three Zones

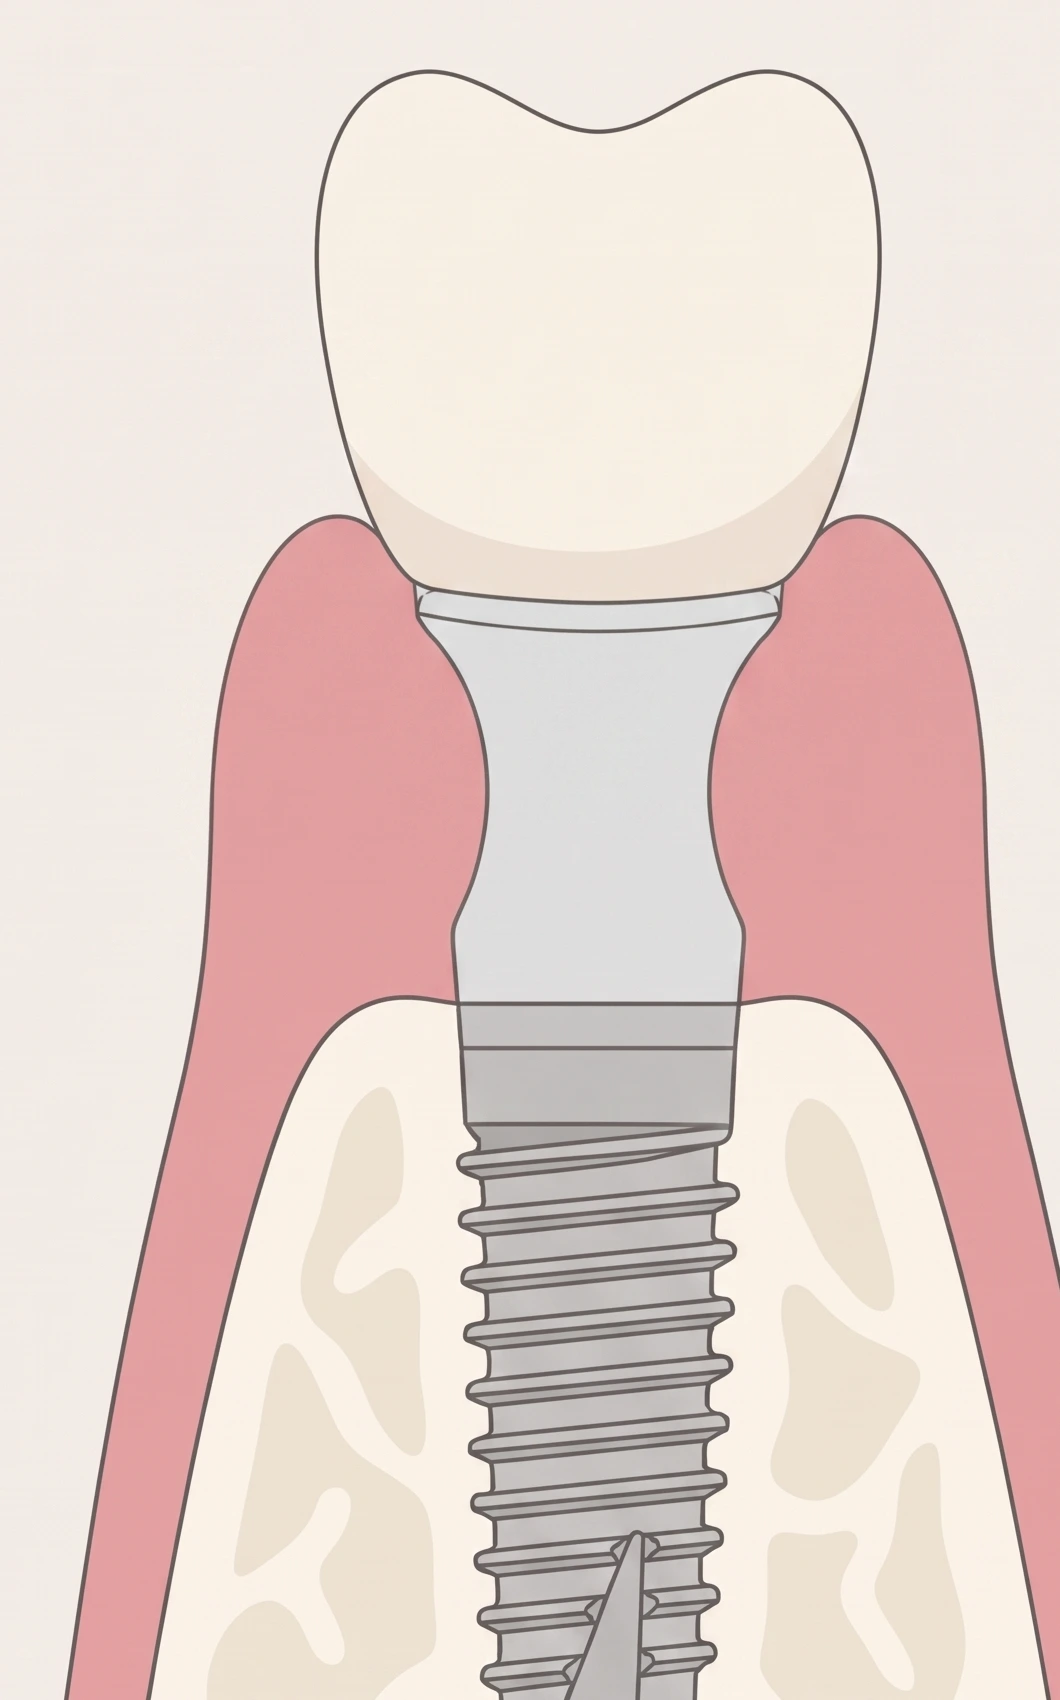
Polishing is one half of how a restoration behaves against tissue. The other is shape. The esthetic biological contour concept divides the emergence profile into three zones, each with its own job, its own ideal morphology and its own preferred material — and treats them as three separate design decisions rather than one continuous curve. Select a zone to see how we handle it.

Cross-section of an implant restoration EBC
Coronal — closest to the visible margin

Esthetic Zone

Function
Esthetic conditioning
Morphology
Convex
Material
Ceramic

Roughly half a millimetre to a millimetre deep, sitting immediately below the free gingival margin. Its convexity is what physically supports that margin and holds the scalloped outline in place — under-contour it and the tissue drops, over-contour it and it blanches. This is the only zone the patient ever sees, and it is ceramic for that reason.

Middle — apical to E, coronal to C

Bounded Zone

Function
Mucosal seal
Morphology
Concave
Material
Zirconia or titanium

The zone that faces the junctional epithelium, and the one where polishing does biological work rather than cosmetic. It should be concave: the hollow creates volume for soft tissue to sit into instead of being pushed away. A highly polished surface here promotes epithelial cell adhesion and a stable mucosal seal, while minimising bacterial colonisation and reducing the risk of peri-implant inflammation.

Apical — at the implant platform

Crestal Zone

Function
Crestal stability
Morphology
Straight or concave
Material
Titanium

The most variable of the three, because its height is set by your implant — its design and how deep it was placed. On a tissue-level implant the zone sits within the implant itself; on a subcrestal placement it spans the depth of placement plus a further 1.5–2 mm before the abutment begins to flare. It should be slim and kept straight, which is why titanium suits it: the mechanical properties allow a thinner wall than ceramic can.

What this means for your prescription. The zones are set by the implant and the tissue, not by us — so send the implant system and placement depth along with a scan that captures the emergence contour. Where an interim restoration has already conditioned the tissue, scan it in place and send the profile: it is the design brief for the definitive, and reproducing it is far more reliable than re-shaping tissue a second time.

Zone framework, morphology and material assignments after Esquivel, Gomez Meda, Strauss & Blatz, J Esthet Restor Dent 2026;38(5):930–940, and Gomez-Meda, Esquivel & Blatz, J Esthet Restor Dent 2021;33(1):173–184. Diagram is our own illustration, drawn from the published framework rather than reproduced from it.
Sources

Further Reading

Where this page reports specific figures or protocols, they come from the following published work. Product-specific parameters should always be taken from the instructions for use for the material being prescribed.

Guidance on this page reflects commonly recommended practice reported in the restorative literature and is provided as a clinical reference. It is not a substitute for the manufacturer's instructions for use, and treatment decisions remain the responsibility of the treating clinician.
At a Glance

Material Comparison

Relative strength, aesthetics and cementation for each material, for quick reference when writing the prescription.

MaterialFlexural StrengthAestheticsCementation
ZirconiaApprox. 600–1,450 MPa by generationGood to very goodConventional; adhesive when indicated
Lithium Disilicate360–500 MPaExcellentAdhesive
PFMSubstructure dependentGoodConventional
Titanium>900 MPaSubstructure onlyScrew-retained
Chrome Cobalt>500 MPaFramework onlyRemovable
Flexible NylonFlexible — not ratedVery goodRemovable
Prescribing Notes

Choosing the Right Material

Strength Before Aesthetics

Where occlusal load, parafunction or span length is the governing risk, specify zirconia or a metal substructure. Aesthetic ceramics can be layered onto the buccal surface where the case allows, but the substructure decision comes first.

Shade and Photography

For anterior lithium disilicate we ask for shade tab photographs taken with the tab in the same plane as the tooth, under natural light where possible. A stump shade for the prepared tooth materially improves the match on thin veneer work.

Not Sure? Ask Us

Send the case through with the clinical situation and we will come back with a material recommendation before we start. There is no charge for planning advice and it saves remakes on borderline cases.

Talk Through A Case

Material advice, prescribing questions or a second opinion on a borderline restoration — we are happy to help before the case is sent.

Contact the Lab